Getting Started With Knex Postgresql and Typescript
Posted on December 31, 2024
Getting Started with KNEX and TypeScript
Hey there! 👋 This guide will show you how to set up a database project using TypeScript and Knex. If you've ever struggled with database setup or wanted a better way to handle your data, you're in the right place.
What's in this Guide?
We'll cover everything you need to know to get up and running:
- Setting up a new TypeScript project (don't worry, we'll go step by step!)
- Getting a PostgreSQL database running with Docker (it's easier than it sounds)
- Connecting to your database using Knex
- Creating database tables the right way
- Using tools to actually see what's in your database
Before You Start
You'll need a few things installed on your computer:
- Node.js and npm (the basic JavaScript stuff)
- Docker (for running our database)
- Some basic knowledge of JavaScript/TypeScript
- A little bit of SQL knowledge (but don't worry if you're rusty)
Ready? Let's build something cool! 🚀
1.1 Installation
This will initialize Npm
npm init -y
Initialize typescript: make sure to install typescript globally
npx tsc --init
This will create a tsconfig.json file.
Initialize eslint:
npx eslint --init
After this, you will be prompted to answer a few questions.
 How would you like to use ESLint? · problems
✔ What type of modules does your project use? · esm
✔ Which framework does your project use? · none
✔ Does your project use TypeScript? · typescript
✔ Where does your code run? · browser
The config that you've selected requires the following dependencies:

eslint, globals, @eslint/js, typescript-eslint
✔ Would you like to install them now? · No / Yes
✔ Which package manager do you want to use? · npm
☕️Installing...

added 116 packages, and audited 118 packages in 2s
This will create a .eslintrc.json file.
Let's install the dependencies:
npm install -D typescript ts-node @types/node nodemon
Now that the basics of our project is setup, let's install project specific packages that we will be using.
npm install pg knex dotenv
Now that we have our project setup, let's create a .env file to store our environment variables.
NODE_ENV=development
DB_HOST=localhost
DB_PORT=5434
DB_USER=postgres
DB_PASSWORD=postgres
DB_DATABASE=knex-postgres
Setting up Postgres via Docker
You can also check out this video for reference:
Make sure that you have docker installed on your machine.
We will now pull the postgres image from docker hub.
docker pull postgres
Create a container with the following command:
docker run --name knex-postgres -e POSTGRES_PASSWORD=postgres -e PGPORT=5434 -d -p 5434:5434 -v knex-postgres:/var/lib/postgresql/data postgres:latest
You can run docker ps to see if the container is running. And get the container id.
Now you can run docker exec -it <container_id> bash to connect to the database.
In my case it will be:
docker exec -it 8a657c67b158 bash
Now you can run postgres with the following command:
psql -U postgres
Now you can run \l to list all the databases.
\l
Now let's create a database with the following command:
CREATE DATABASE "knex-postgres";
# or alternatively:
CREATE DATABASE knex_postgres;
Now you can run \c knex-postgres to connect to the database:
\c knex-postgres
postgres=# CREATE DATABASE "knex-postgres";
postgres=# \c knex-postgres
You are now connected to database "knex-postgres" as user "postgres".
You can now exit the postgres shell with the following command:
\q
Now you can exit the container with the following command:
exit
Now you can run docker ps to see if the container is running.
docker ps
You should see the container running.
Now you can run docker stop <container_id> to stop the container.
docker stop 8a657c67b158
You can directly start your postgres container with the following command:
# If container doesn't exist yet:
docker run --name knex-postgres -e POSTGRES_PASSWORD=postgres -e PGPORT=5434 -d -p 5434:5434 -v knex-postgres:/var/lib/postgresql/data postgres:latest

# If container already exists, simply start it:
docker start knex-postgres
If you need to remove the existing container and create a new one:
# Stop the container if it's running
docker stop knex-postgres

# Remove the container
docker rm knex-postgres

# Then you can run the create command again
docker run --name knex-postgres -e POSTGRES_PASSWORD=postgres -e PGPORT=5434 -d -p 5434:5434 -v knex-postgres:/var/lib/postgresql/data postgres:latest
Now that we have our database setup, let's create our src/config folder and create a index.ts file.
mkdir src
mkdir src/config
touch src/config/knex.ts
In the knex.ts file, let's add the following code:
import dotenv from "dotenv";
import knex from "knex";
dotenv.config();

const { DB_HOST, DB_PORT, DB_USER, DB_PASSWORD, DB_DATABASE } = process.env;

const db = knex({
  client: "postgresql",
  connection: {
    host: DB_HOST,
    port: Number(DB_PORT),
    user: DB_USER,
    password: DB_PASSWORD,
    database: DB_DATABASE,
  },
  debug: true,
  pool: {
    min: 2,
    max: 10,
  },
});

export const onDatabaseConnect = async () => {
  await db.raw("SELECT 1");
};

export default db;
And now let's create a src/index.ts file.
touch src/index.ts
In the index.ts file, let's add the following code:
import { onDatabaseConnect } from "./config/knex";

onDatabaseConnect();
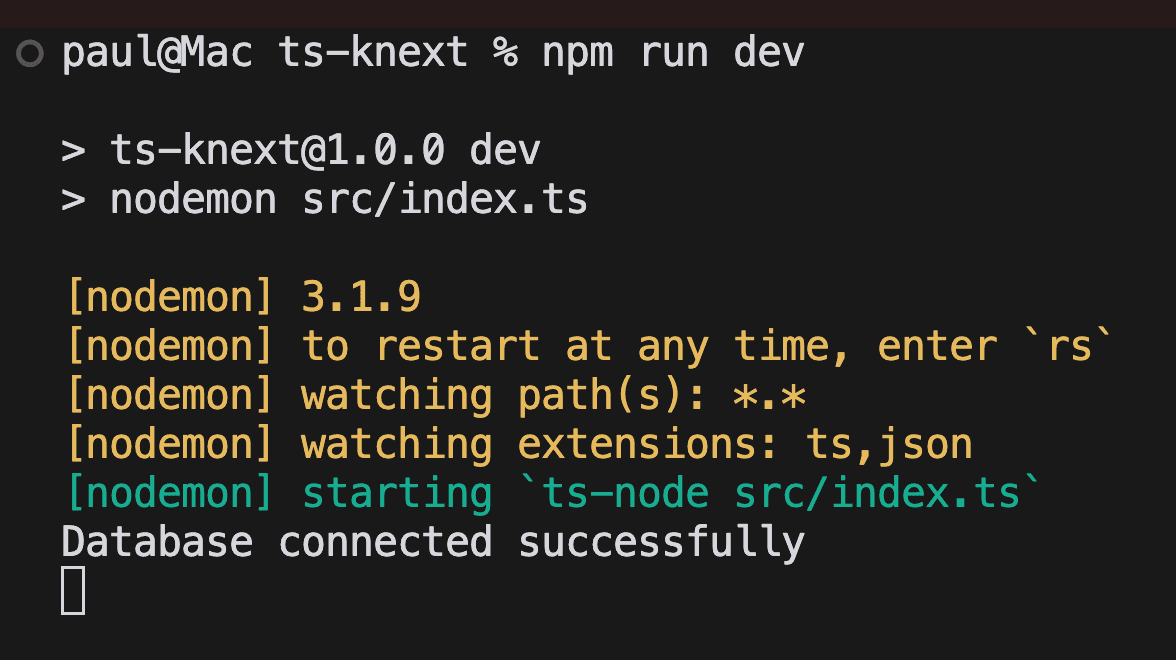
You can now run the following command to start the server:
nodemon src/index.ts
You should see the following output:
Database connected successfully
Let's update the package.json file to add the following scripts:
"scripts": {
    "test": "echo \"Error: no test specified\" && exit 1",
    "dev": "nodemon src/index.ts",
    "start": "ts-node src/index.ts"
  },
Now you can run the following command to start the server:
npm run dev
You should see the following output:
> nodemon src/index.ts

[nodemon] 3.1.9
[nodemon] to restart at any time, enter `rs`
[nodemon] watching path(s): *.*
[nodemon] watching extensions: ts,json
[nodemon] starting `ts-node src/index.ts`
{
  method: 'raw',
  sql: 'SELECT 1',
  bindings: [],
  options: {},
  __knexQueryUid: 'BQYyUM-ZkFQ-lfj-n5kyX'
}
Database connected successfully
1.2 Initialize the Knex CLI
Now that we have our project setup, let's initialize the Knex CLI.
Make sure to install the knex cli globally:
npm install knex -g
Now you can initialize the Knex CLI with the following command:
npx knex init -x ts
This will create a knexfile.ts file in the root of the project.
import type { Knex } from "knex";

// This is the main configuration file for Knex.js, a SQL query builder
// It defines different database configurations for different environments

const config: { [key: string]: Knex.Config } = {
  // Development environment configuration
  development: {
    client: "sqlite3", // Using SQLite database for development
    connection: {
      filename: "./dev.sqlite3", // Local SQLite database file path
    },
  },

  // Staging environment configuration (pre-production)
  staging: {
    client: "postgresql", // Using PostgreSQL for staging
    connection: {
      database: "my_db", // Database name
      user: "username", // Database user
      password: "password", // Database password
    },
    pool: {
      min: 2, // Minimum number of connections in pool
      max: 10, // Maximum number of connections in pool
    },
    migrations: {
      tableName: "knex_migrations", // Table to store migration history
    },
  },

  // Production environment configuration
  production: {
    client: "postgresql", // Using PostgreSQL for production
    connection: {
      database: "my_db", // Database name
      user: "username", // Database user
      password: "password", // Database password
    },
    pool: {
      min: 2, // Minimum number of connections in pool
      max: 10, // Maximum number of connections in pool
    },
    migrations: {
      tableName: "knex_migrations", // Table to store migration history
    },
  },
};

// Export the configuration for use in the application
module.exports = config;
This file is used to configure the different database configurations for different environments, like development, staging, and production.
Let's update the knexfile.ts file to the following:
import type { Knex } from "knex";
import dotenv from "dotenv";
dotenv.config();

const { DB_HOST, DB_PORT, DB_USER, DB_PASSWORD, DB_DATABASE } = process.env;

const config: { [key: string]: Knex.Config } = {
  development: {
    client: "postgresql",
    connection: {
      host: DB_HOST,
      port: Number(DB_PORT),
      user: DB_USER,
      password: DB_PASSWORD,
      database: DB_DATABASE,
    },
    debug: true,
    pool: {
      min: 2,
      max: 10,
    },
    migrations: {
      tableName: "knex_migrations",
    },
  },

  staging: {
    client: "postgresql",
    connection: {
      host: DB_HOST,
      port: Number(DB_PORT),
      user: DB_USER,
      password: DB_PASSWORD,
      database: DB_DATABASE,
    },
    debug: true,
    pool: {
      min: 2,
      max: 10,
    },
    migrations: {
      tableName: "knex_migrations",
    },
  },

  production: {
    client: "postgresql",
    connection: {
      database: "my_db",
      user: "username",
      password: "password",
    },
    pool: {
      min: 2,
      max: 10,
    },
    migrations: {
      tableName: "knex_migrations",
    },
  },
};

module.exports = config;
2.0 Using Knex CLI
2.1 Creating a Migration
We can create a migration with the following command:
npx knex migrate:make <migration_name>
Let's create our first migration.
npx knex migrate:make first_migration
This will create a migrations folder in the root of the project.
You will see an new folder created called migrations with a file called first_migration.ts. Which is based on the name we specified.
We can use the up and down functions to define the migration.
The up function is used to create the table and the down function is used to drop the table.
So let's create our first table via the up function in the first_migration.ts file.
Let's add the following code to the first_migration.ts file:
export async function up(knex: Knex): Promise<void> {
  await knex.schema
    .createTable("authors", (table) => {
      table.increments("id").primary();
      table.string("first_name").notNullable();
      table.string("last_name").notNullable();
      table.string("bio").notNullable();

      // table.date("created_at").defaultTo(knex.fn.now());
      // table.date("updated_at").defaultTo(knex.fn.now());

      table.timestamps(true, true); // This will create two columns: created_at and updated_at
  });
}
This will create a authors table with the following columns: id, first_name, last_name, bio, and created_at, updated_at.
Now let's create another table called categories with the following columns: id, name, description, and created_at, updated_at.
Let's add the following code to the first_migration.ts file:
export async function up(knex: Knex): Promise<void> {
  // previous code
    .createTable("categories", (table) => {
      table.increments("id").primary();
      table.string("name").notNullable().unique().index();
      table.string("description").notNullable();
      table.timestamps(true, true);
    });

  // rest of the code
}
And finally let's create a posts table with the following columns: id, title, content, author_id, category_id, created_at, updated_at.
export async function up(knex: Knex): Promise<void> {
  // previous code
    .createTable("posts", (table) => {
      table.increments("id").primary();
      table.string("title").notNullable();
      table.string("content").notNullable();
      table.string("slug").notNullable().unique().index();
      table.integer("author_id").references("id").inTable("authors");
      table.integer("category_id").references("id").inTable("categories");
      table.timestamps(true, true);
    });

  // rest of the code
}
Let's and the down function to the first_migration.ts file.
This function is used to rollback the migration.
export async function down(knex: Knex): Promise<void> {
  await knex.schema.dropTable("posts");
  await knex.schema.dropTable("categories");
  await knex.schema.dropTable("authors");
}
The complete code for the first_migration.ts file should look like this:
import type { Knex } from "knex";


export async function up(knex: Knex): Promise<void> {
  await knex.schema
    .createTable("authors", (table) => {
      table.increments("id").primary();
      table.string("first_name").notNullable();
      table.string("last_name").notNullable();
      table.string("bio").notNullable();
      table.timestamps(true, true);
    })
    .createTable("categories", (table) => {
      table.increments("id").primary();
      table.string("name").notNullable().unique().index();
      table.string("description").notNullable();
      table.timestamps(true, true);
    })
    .createTable("posts", (table) => {
      table.increments("id").primary();
      table.string("title").notNullable();
      table.string("content").notNullable();
      table.string("slug").notNullable().unique().index();
      table.integer("author_id").references("id").inTable("authors");
      table.integer("category_id").references("id").inTable("categories");
      table.timestamps(true, true);
    });
}

export async function down(knex: Knex): Promise<void> {
  await knex.schema.dropTable("posts");
  await knex.schema.dropTable("categories");
  await knex.schema.dropTable("authors");
}
Now that we have our migration created, let's run it.
knex migrate:latest
Let's review what we have done so far.
We have created a migration file called first_migration.ts and we have created three tables: authors, categories, and posts.
We have also created the up and down functions to define the migration.
And then we ran the migration.
Because we have debug set to true in the knexfile.ts file, we can see the SQL query that is being executed.
Requiring external module ts-node/register
Using environment: development
[
  {
    sql: 'select * from information_schema.tables where table_name = ? and table_schema = current_schema()',
    bindings: [ 'knex_migrations' ],
    output: [Function: output]
  }
]
[
  {
    sql: 'create table "knex_migrations" ("id" serial primary key, "name" varchar(255), "batch" integer, "migration_time" timestamptz)',
    bindings: []
  }
]
[
  {
    sql: 'select * from information_schema.tables where table_name = ? and table_schema = current_schema()',
    bindings: [ 'knex_migrations_lock' ],
    output: [Function: output]
  }
]
[
  {
    sql: 'create table "knex_migrations_lock" ("index" serial primary key, "is_locked" integer)',
    bindings: []
  }
]
{
  method: 'select',
  options: {},
  timeout: false,
  cancelOnTimeout: false,
  bindings: [],
  __knexQueryUid: 'U3UV36Xoct1wrr2p9xyvX',
  sql: 'select * from "knex_migrations_lock"'
}
{
  method: 'select',
  options: {},
  timeout: false,
  cancelOnTimeout: false,
  bindings: [],
  __knexQueryUid: 'b4aKw2wPnYWOn4ihXnUB2',
  sql: 'select * from "knex_migrations_lock"'
}
{
  method: 'insert',
  options: {},
  timeout: false,
  cancelOnTimeout: false,
  bindings: [ 0 ],
  __knexQueryUid: 'K4oEGI-7nI-xyIijqZG4Q',
  sql: 'insert into "knex_migrations_lock" ("is_locked") values (?)',
  returning: undefined
}
{
  method: 'select',
  options: {},
  timeout: false,
  cancelOnTimeout: false,
  bindings: [],
  __knexQueryUid: 'fERWN9yVzCXyXtIcIgFNC',
  sql: 'select "name" from "knex_migrations" order by "id" asc'
}
{
  method: 'update',
  options: {},
  timeout: false,
  cancelOnTimeout: false,
  bindings: [ 1, 0 ],
  __knexQueryUid: 'UnTlZzWGFNt2XqPOpkbYC',
  sql: 'update "knex_migrations_lock" set "is_locked" = ? where "is_locked" = ?',
  returning: undefined
}
[
  {
    sql: 'select * from information_schema.tables where table_name = ? and table_schema = current_schema()',
    bindings: [ 'knex_migrations' ],
    output: [Function: output]
  }
]
[
  {
    sql: 'select * from information_schema.tables where table_name = ? and table_schema = current_schema()',
    bindings: [ 'knex_migrations_lock' ],
    output: [Function: output]
  }
]
{
  method: 'select',
  options: {},
  timeout: false,
  cancelOnTimeout: false,
  bindings: [],
  __knexQueryUid: 'IsXbENGTLqQse1lb3kNFY',
  sql: 'select * from "knex_migrations_lock"'
}
{
  method: 'select',
  options: {},
  timeout: false,
  cancelOnTimeout: false,
  bindings: [],
  __knexQueryUid: 'ACnmG8AYfF05Kv5M4YTmt',
  sql: 'select "name" from "knex_migrations" order by "id" asc'
}
{
  method: 'select',
  options: {},
  timeout: false,
  cancelOnTimeout: false,
  bindings: [],
  __knexQueryUid: 'v-e3eLaI1_kv9-DzhlMlV',
  sql: 'select max("batch") as "max_batch" from "knex_migrations"'
}
[
  {
    sql: 'create table "authors" ("id" serial primary key, "first_name" varchar(255) not null, "last_name" varchar(255) not null, "bio" varchar(255) not null, "created_at" timestamptz not null default CURRENT_TIMESTAMP, "updated_at" timestamptz not null default CURRENT_TIMESTAMP)',
    bindings: []
  },
  {
    sql: 'create table "categories" ("id" serial primary key, "name" varchar(255) not null, "description" varchar(255) not null, "created_at" timestamptz not null default CURRENT_TIMESTAMP, "updated_at" timestamptz not null default CURRENT_TIMESTAMP)',
    bindings: []
  },
  {
    sql: 'alter table "categories" add constraint "categories_name_unique" unique ("name")',
    bindings: []
  },
  {
    sql: 'create index "categories_name_index" on "categories" ("name")',
    bindings: []
  },
  {
    sql: 'create table "posts" ("id" serial primary key, "title" varchar(255) not null, "content" varchar(255) not null, "slug" varchar(255) not null, "author_id" integer, "category_id" integer, "created_at" timestamptz not null default CURRENT_TIMESTAMP, "updated_at" timestamptz not null default CURRENT_TIMESTAMP)',
    bindings: []
  },
  {
    sql: 'alter table "posts" add constraint "posts_slug_unique" unique ("slug")',
    bindings: []
  },
  {
    sql: 'create index "posts_slug_index" on "posts" ("slug")',
    bindings: []
  },
  {
    sql: 'alter table "posts" add constraint "posts_author_id_foreign" foreign key ("author_id") references "authors" ("id")',
    bindings: []
  },
  {
    sql: 'alter table "posts" add constraint "posts_category_id_foreign" foreign key ("category_id") references "categories" ("id")',
    bindings: []
  }
]
{
  method: 'insert',
  options: {},
  timeout: false,
  cancelOnTimeout: false,
  bindings: [ 1, 2024-12-31T19:09:51.848Z, '20241231184940_first_migration.ts' ],
  __knexQueryUid: '1knRTbb5LN6Tifm5lZP6p',
  sql: 'insert into "knex_migrations" ("batch", "migration_time", "name") values (?, ?, ?)',
  returning: undefined
}
{
  method: 'update',
  options: {},
  timeout: false,
  cancelOnTimeout: false,
  bindings: [ 0 ],
  __knexQueryUid: 'WX3fonPRbTZZAfa0NpYCZ',
  sql: 'update "knex_migrations_lock" set "is_locked" = ?',
  returning: undefined
}
Batch 1 run: 1 migrations
So before continuing, let's see how we can view our database tables.
2.2 Viewing the Database Tables
There are many great tools to view your database tables.
But we are going to set up DBeaver to view our database tables. It's a free and open source database tool that supports many databases.
Go ahead and download and install DBeaver for your operating system.
Once installed, let's add a new connection to our database.
Once you start DBeaver, it will ask you few questions.
Instead of creating a new table, let's connect to our existing database.
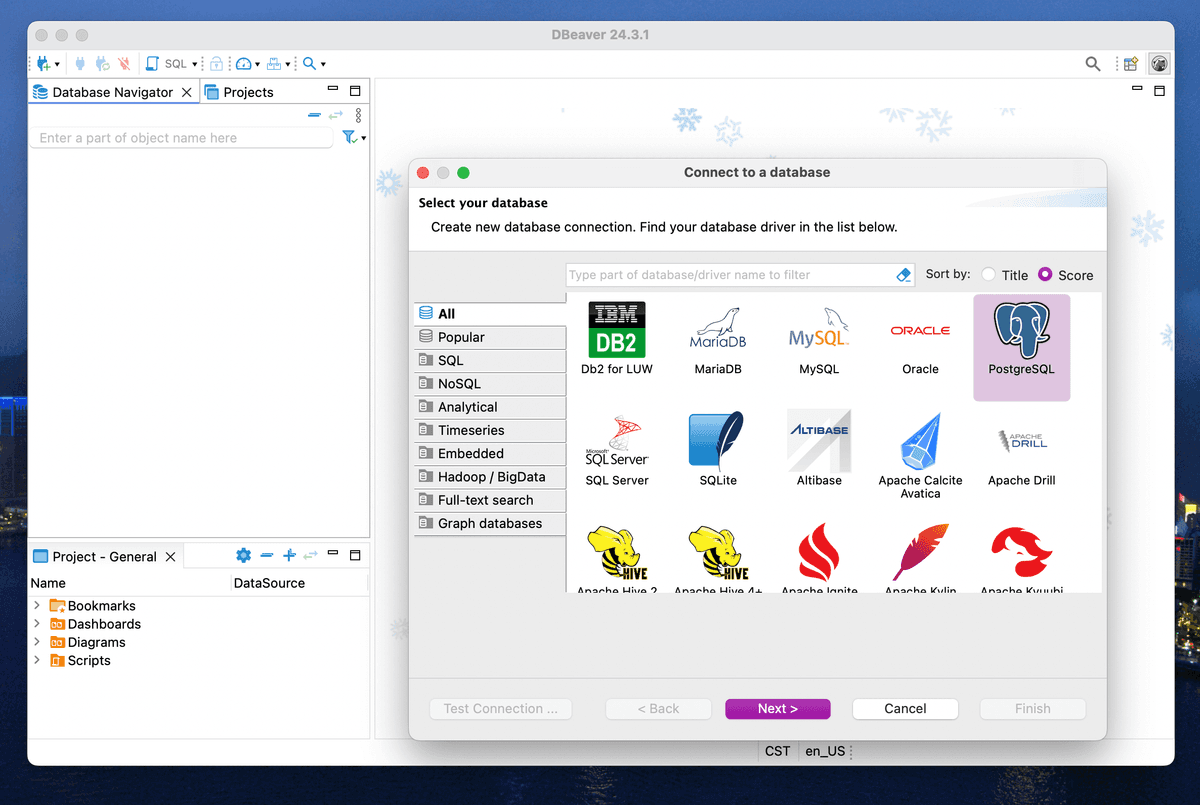
If you don't see the view, just click on the + icon on the left side on the top of the screen.
You can check out this video for reference.
Select the PostgreSQL driver and click on Next.
You should see the following screen:
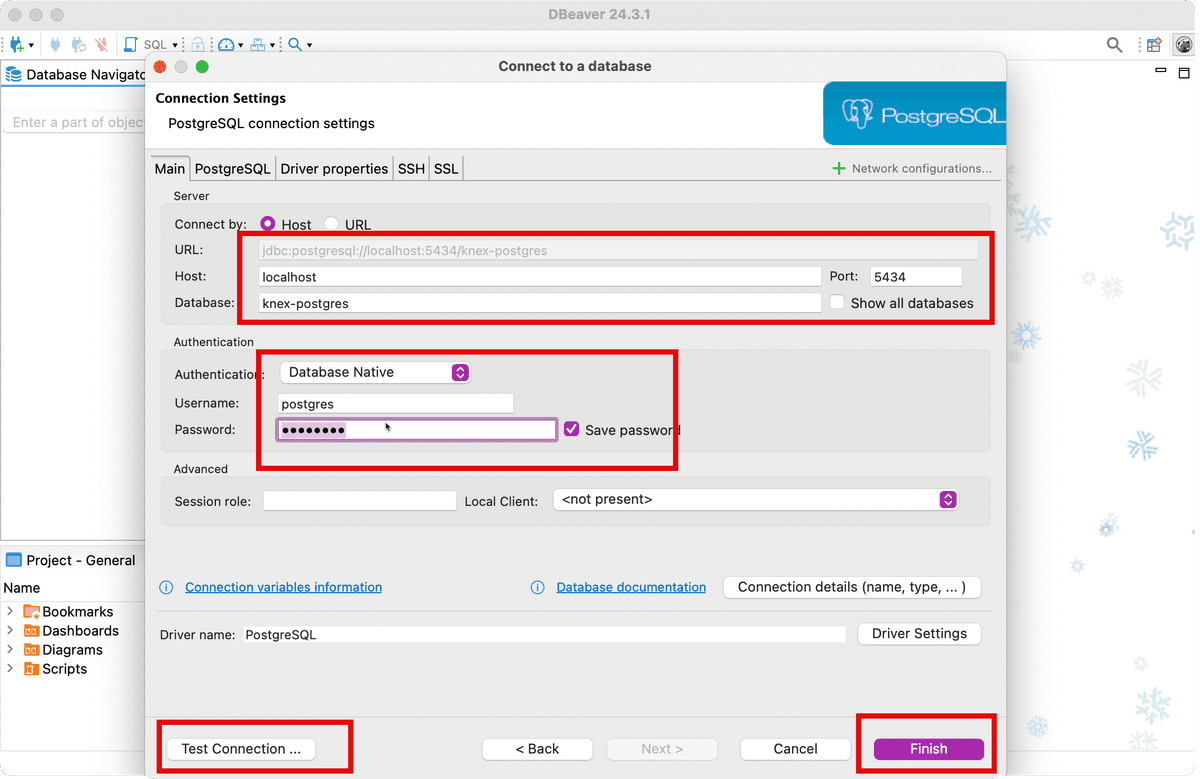
We will use the following connection details:
- Host: localhost
- Port: 5434
- Username: postgres
- Password: postgres
- Database: knex-postgres
As you can see, we have already filled in the connection details.
You can click on Test Connection to test if the connection is successful. And then click on Finish.
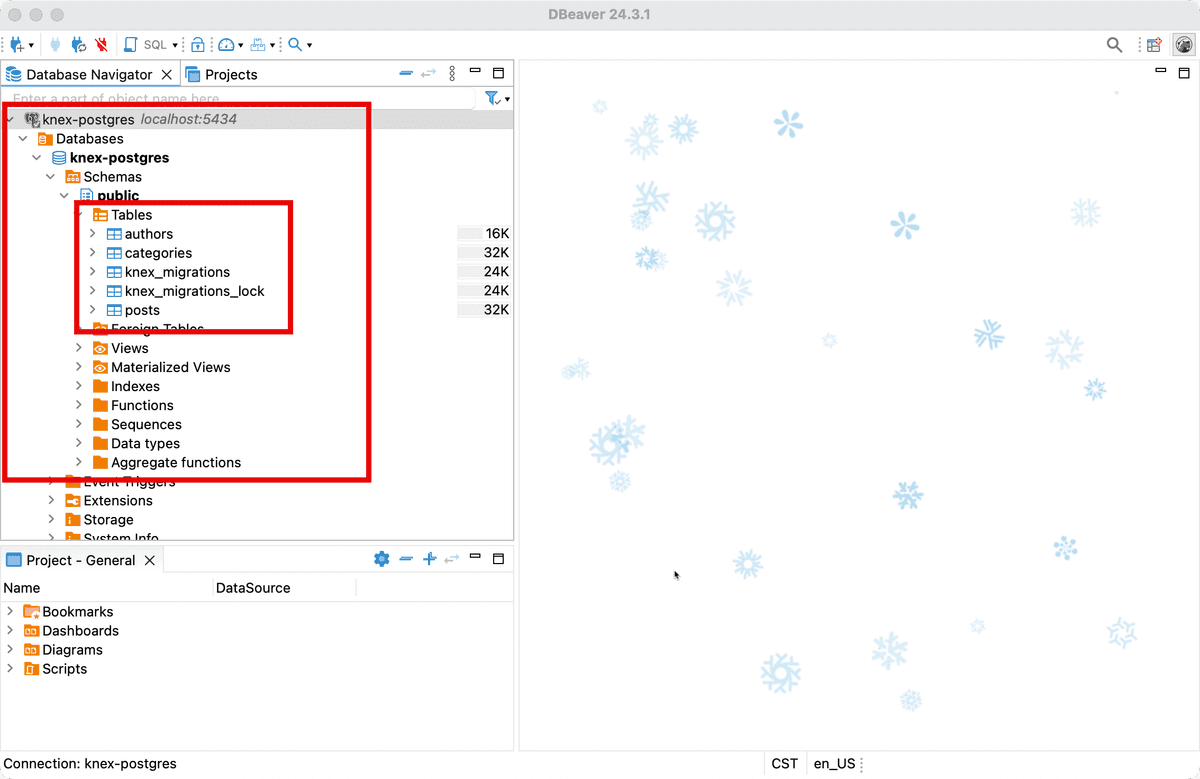
Great! Now you should be able to see your database tables.
Conclusion
In this comprehensive guide, we've covered several crucial aspects of setting up a modern TypeScript-based database project using Knex.js:
-
Project Setup: We learned how to properly initialize a TypeScript project with essential development tools like ESLint and necessary dependencies.
-
Docker Integration: We covered how to set up a PostgreSQL database using Docker, making our development environment consistent and portable.
-
Database Configuration: We implemented proper database configuration using environment variables and Knex.js configuration files, following security best practices.
-
Migrations: We explored how to create and run database migrations, which are essential for:
- Version controlling database schema changes
- Maintaining data integrity
- Enabling team collaboration
- Facilitating deployment across different environments
-
Database Management: We set up DBeaver as a database management tool, making it easier to visualize and interact with our database.
Understanding these concepts is crucial for modern web development because:
- It enables scalable database management
- Provides a solid foundation for building robust applications
- Ensures consistent development environments across teams
- Makes deployment and maintenance more manageable
The combination of TypeScript, Knex.js, and PostgreSQL creates a powerful and type-safe foundation for building data-driven applications. By following these practices, you're well-equipped to develop professional-grade applications with proper database management and version control.